Monday, April 30, 2012

Add a Pop of Color to Your Day!

Hey Everyone!


So today I wanted to talk to you all about a new up-and-coming nail trend...moon nails! It was quite a hit in the mid 1900's, and it's now making a comeback! Celebrities from Lady Gaga to Kendall Jenner sport these fun moon styled nails out on the town. If you can see, the bottom half of her nail is actually painted different color, it isn't just chipped polish. Want to find out the secret? Well we aren't called sparkly little secrets for nothing! ;) Keep reading to find out more. :)


***Now, I am not a professional nail stylist so in these pictures you will find mistakes, and I apologize in advance, but it takes a lot of practice to get the crescent to look just right on the nail!***


If you want to re-create this look the first thing you are going to want to do is get some supplies. For this tutorial you are going to need a top and base coat nail polish, as well as your 2 favorite color polishes. (I use 4 different colors just to show different color combinations). You are also going to need any type of hand lotion.(This softens your skin so if you get any polish on your skin through the process it will come off easier later if your skin is soft and moisturized. I am using the EOS hand lotion because I love the way it feels on my skin and it leaves my hands feeling really soft and silky.) The last-and probably most important thing- you will need for this tutorial is reinforcements. These bad boys are the key to making the crescent moon shape on your nails look perfect. Now, it's hard to see in my pictures because my reinforcements are clear, but I'll explain exactly how to apply them when the time comes.


In this tutorial I'm using 3 of my favorite spring colors. On the left is OPI Feelin' Hot-Hot-Hot, then in the middle is Essie Need A Vacation and finally on the right is OPI in A Grape Fit! Fun and Bright and perfect for the spring time!


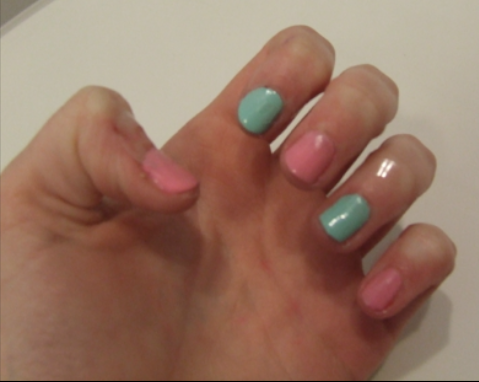
So the first step is to trim and buff all of your nails to make sure they're nicely shaped and don't have any rough edges. Next, quickly paint a sheer base coat just to smooth out any cracks you may have on your nails. This will leave an even base to have the polish be applied to. Next, apply 2-3 thin coats of your favorite lighter polish evenly across the nail. To the left you will see I have 2 different colors...again that is only to show you guys different color options. You need to make sure you let these coats dry so the nails are brittle. You want to put enough color on the nail so it isn't streaky, but not so much that it seems goopy on your nail, because that will cause problems when you stick the reinforcement on it later. Let them dry for a good 20 minutes to make sure they're brittle for the step.


Does this picture seem similar? Well it's practically the same, except for the fact that I added reinforcements to the bottom halves of my nails. I actually added them at different lengths to show the different style of moon shapes you can have. You can put it right near the bottom of your nail like Kendall had it pictured earlier, (that is the classic crescent moon shape) or move the reinforcement higher to make it look like a thick, bright french manicure! I did it both ways to give you guys options.


After you have chosen a length that you would like your reinforcements to be placed at, the next step is to paint over your nails again in a second color. Preferably a darker color then the one you painted your base with. For the light pink I added a darker magenta and for the teal I added a pop of royal purple! If you get some nail polish on the reinforcement that's ok. Just like in the picture to the left, it looks really messy, but that is only because I got some of the polish on the reinforcement.After a few minutes of letting that dry, You can peel the reinforcement off. Leaving *hopefully*nice clean, beautiful crescent moon design on your nails! If the paint peels or sticks to the reinforcement, that's ok. A little touch up with a carefully applied coat will clean that right up. Don't get discouraged it happens to the best of us. It takes a lot of practice to master ;) As you can see the final picture has colors of all different lengths, now when you do this on yourself you would want to make them as close to the same length as possible. And you would probably stick to the same 2 colors on each nail...but feel free to go all out! This is such a fun, easy look so feel free to experiment with different color combinations and glitters and textures! Leave pictures in the comments below if you decide to try this look out because I would love to see new color combinations and any other fun tricks you guys use to paint your nails! Thanks so much and I love you all :)


xoxo-


Kristin :)

p.s. Want me to let you in on another sparkly little secret? If you are anything Like me, you don't enjoy paying upwards of $7 for a nail polish. What if I told you there was a way you didn't have to...but still were able to get the colors you wanted. WELL NOW YOU CAN! Click this link right here to get all of your favorite Orly, Essie, and China Glaze polishes for about half the price! :)

DIY: Body Scrub!

Hey girls! Today I wanted to share with you a really simple, efficient body scrub recipe! I've used it before and it exfoliates gently, but not to the point where it gives you redness on your skin (and this is coming from a girl with sensitive skin!) It works well, as opposed to some other Do it yourself things that never end up working like you wanted them to. All of the ingredients are so simple I bet you have all of them-if not half-in your kitchen right now! That being said let's hop into the ingredients!
What you'll need:
1/2 cup brown sugar
1/2 cup white sugar
2 tablespoons sea salt salt
2 tablespoons avocado or olive oil
1/4 cup of your favorite liquid soap
And the juice from either
One lemon, one lime or
half a grapefruit


For my mixture I chose to use a lime because I feel like a lemon is too acidic on my skin. The soap I used was Kiehl's Liquid Hand Soap in Pear Tree Corner. with the ingredients you want to fist add the two sugars and the salt then gently stir them together. Next, I added the Olive Oil, soap and lime juice and mixed until smooth. I'll include some pics here and include an update later after I use it again!


The last picture is what it looks like when finished! (It looks super gross but I promise is smells and feels ah-mazing) I was scared to try it because I can't stand the smell of brown sugar but once you add the soap it smells so good! You can also add in a few drops of essential oils if you'd like!


Saturday, April 28, 2012

My Everyday Foundation Routine

Hey everyone! I have been using my Covergirl Natureluxe foundation for about 3 weeks now, and I have really been loving how I apply it! So today's post is dedicated to show you how I apply my foundation, and keep in mind you can totally substitute in your foundation and just follow the remaining steps. Let's get started!


Step 1: I apply my Garnier Nutritioniste Skin Renew Anti-Puff Eye Roller underneath my eyes and moisturize my face with Jergens Natural Glow. If I have any blemishes, I will apply my Neutrogena Rapid Clear spot treatment to the problematic area.


Step 2: Next, I take my L'Oreal Magic Perfecting Base and apply an even coat on my face. I suggest using a base because it really helps your makeup go on smoother, minimizes the appearence of your pores, and makes your skin feel softer!


Step 3: Using my fingers I take my Laura Mercier Secret Concealer in shade 1 and apply that under my eyes to hide my dark circles. Also, I take my Physicians Formula Concealer Twins in shade Yellow/Light  and mix the two shades on the back of my hand and apply that concealer mix to any blemishes using my fingers.


Step 4: Then, I take my Covergirl Natureluxe foundation in 310 (Flax) and put a pea sized amount to the back of my hand. Using my ring finger I dot the foundation on my cheeks, forehead, under my neck, under my eyes, and a small amount on my nose and chin. Taking my Sigma F60 Foundation brush, I blend the dotted foundation all over my face.


Step 5: I then take my Sigma F30 Powder Brush and put my Maybelline Dream Matte powder all over my face to set the foundation. Then, I take my Nars Laguna Bronzer and a Sonia Kashuk face brush. I contour my cheeks and then apply a light dusting of the bronzer to the rest of my face for a bit of color.


Step 6: For the final step, I apply a natural blush such as Ladyblush by Mac to the apples of my cheeks.


Now you're done! Even though my routine is six steps, it takes me literally 5 minutes to do in the morning. I love how the finished look is super natural, and it gives me just enough coverage to feel even more confident! Keep in mind, this is just what I do for my everyday face makeup and you can totally swap in the products that work for you. I'd love to hear what your foundation routine is in the comments below! Remember, stay classy everyone!


-Landon

Friday, April 27, 2012

Neutral Everyday Makeup!

Hey girls! Today I'm going to be showing you a super easy neutral makeup look that's perfect for school or just hanging around. It's what I normally wear to school that gives you just enough, but not too much.

Step 1 (Optional*): I apply L'Oreal Visible Lift Foundation using a Sigma F60 Foundation brush

Step 2: I place Physicians Formula Conceal Rx under my eyes and on any blemishes, then blend using either my fingers or a Sigma F70 Concealer brush.

Step 3: Next, I set my concealer and foundation with Too Faced Amazing Face Skin-Balancing Powder using a Sigma F50 Duo Fibre brush.

Step 4: I apply a light blush such as Maybelline Fit Me in Medium Coral to the apples of my cheeks using a Sigma F40 Medium Angled Contour Brush.


Step 5: I prime my eyes using Urban Decay's Primer Potion in Original and apply a neautral eye color such as Too Faced La Cage. For a more put together feel I'll apply a color such as Too Faced Rapture to the crease and outer corner (don't forget to blend out harsh lines!)and Silk Stockings as a highlight. I use 4 different Sigma brushes for this E55 Flat Shading, E30 Pencil, E40 Tapered Blending, and E70 Medium Angled Shading


Step 6: I curl my lashes using a Revlon Eye Lash Curler and apply a few coats of my favorite mascara (Lancome L' Extreme, Maybelline Colossal/The Falsies, or L'Oreal Double Extend In Black Bronze-Green/Hazel Eyes)

Step 7: Lastly I'll apply a simple lip color such as Revlon Lip Butter In Cotton Candy, Maybelline Baby Lips in Cherry Me, or Nars Lip gloss in Sweet Revenge.

*The Foundation is optional, since my powder is a "foundation powder" I mostly only use liquid foundation in the Winter.

Thanks for reading and I hope that this helped you! Again, these are just the products I use as a suggestion, use whatever color fits you best!

Xoxo
Audrey :)

"True friends are like diamonds-bright, beautiful, valuable, and always in style." -Nicole Richie

Monday, April 23, 2012

Airfoam Foundation Isn't So Sky High

Hey Girls!
Are you that girl who yearns for that perfect, flawless skin that all the other girls envy? I know I am! Unfortunately for me, I have very problematic skin. I get acne, and depending on the season, I tend to get very shiny or flakey. But that's life, sometimes you have to face the facts and try to move forward. So with me, it's very important to have a high coverage foundation that can cover all of my problem areas while still giving me a flawless look, without looking cakey.


When I first heard of the Maybelline Dream Nude Airfoam Foundation I thought it was such a cool concept. A foam foundation that came out of a pump that is light weight and has a flawless finish. It's a very similar concept to the soap we all loved as little kids....I'm sure you know that one I'm talking about. ;) I thought this foundation was the perfect solution for my skin! I went to my local Harmon's to try out the product and I had very high expectations, although hearing mixed reviews about the product. After trying it out a few times, I came to the conclusion that I am not a huge fan. I liked how light the consistency was and how it was easily blendible but something about it didn't feel right on my face. I soon noticed after the second or third time trying it, the foundation had been hardening to my face. It was wet when it came out of the bottle which allows it to be blended easily, but after it sets on your face it leaves your skin very dry which I didn't personally enjoy. It made my skin start to flake and if it wasnt blended perfectly you could see the discoloration all over my face...which is normally not that bad, except for the fact that it was orange. As I have said before I have very fair skin, and I always have to look for the lightest foundation out there. I grabbed the lightest shade of the Airfoam, but it was still very orange on my skin, which seemed a little bit odd, especially since it was the lightest one there. In the picture below I show what comes out of the tube after I push the pump one time. THAT'S A LOT OF PRODUCT! That's another downside, you loose a lot of product each time you press the pump. You barely need any of the foundation to cover your whole face, but a bunch comes out after one little squirt. I end up having to wipe off and the throw out a large chunk each time I apply.


Overall I think the product has a lot of potiential, but it isn't quite there yet. I know other brands have foundations very similar and I may have to try those to see if its just this brand, or the formula in general. If the Maybelline had more color options too it may appeal to more people. There are so many different skin colors out there, and to only have 16 different colors doesn't leave very many options for everyone. I don't think I'd buy this product again, but I may try something similar in the future that may be closer to my skin color if need be. But hey, maybe I'll be able to crack this foundation back out again in the summer when I'm a little bit tanner....just kidding I don't tan at all! I freckle...or burn...so maybe I won't be using this foundation again. Oh well, you win some you lose some!


Have you tried out this foundation? Leave me a comment below telling me what your thoughts were about it. :) 


Kristin <3

Review: Maybelline Dream Bouncy Blush!

Maybelline claims that this will be the "freshest flush ever," and I couldn't agree more. The closet thing I can describe the bounce to is when you press on a Tempurpedic mattress and for a short while it leaves an imprint, the same thing happens in the blush. I own the blush in shade #15 Rose Petal.
Application:
The way you want to apply this is with your fingertips, slowly swirl it around until you have a good amount on your fingers then apply in an upward motion to the apples of your cheeks.
Consistency:
It's described as feeling "Lightweight like a powder, yet it melts seamlessly into skin like a cream," which is the best way to describe it.  While blending it feels silky and smooth-like a cream; but once applied, it dries like a powder. It doesn't give you that feeling it will smudge like certain creams do at all, because it truly feels like a powder on your skin.

It lasts a very long time and this color is my favorite springtime blush because it gives me that perfect amount of color, without being too much or overwhelming. It doesn't feel heavy at all which I love because that's usually the number one reason I'm hesitant to buy cream blushes. Overall, it's a great product that I will definitely repurchase!

Xoxo :)
Audrey....
"Happy girls are the prettiest." -Audrey Hepburn

Sunday, April 22, 2012

Five Different Ways to Rock a Braid

Hey girls! The weekend is almost over, and I was thinking about some cute hairstyles for school this week that had a unique twist to them. What came to mind you ask? Braids! I think braids make hairstyles look so much more intricate and they're a super girly way to transform your hair from plain to perfect! 


Braided Top Knot- Take a break from your simple top knot! The braided top knot is just as easy but gives off a super charming touch. Simply, gather your hair into a high ponytail and secure it with an elastic. Next, start braiding your hair all the way down the ponytail and secure the end with another elastic. Then, twist the braid around the top of your head and secure the end that sticks out with a bobbypin near the bun. (For a super girly feel, grab a few small pieces of hair from the front of your face to leave out and curl them with a 1/2 to 1 inch curling wand!)

Side Braid with a Scarf- Take a smaller satin-esque scarf and put it behind your hair. Then, pull the ends of the scarf up around your ears and tie it at the top of your head so it looks like a headband. Adjust the headband so that the knot you tied is now next to your right ear. Gather your hair into a low side ponytail with the remaining stands of the scarf on the right side of your face. Then, section the ponytail into three equal parts incorporating the scarf. Once you have your three equal sections, start to do the classic braid throughout the ponytail and secure with an elastic! Check out Stilababe09's video on this hairstyle, and a bunch of others!

Braided Headband- This look is a bit more complicated but it's sooo worth it in the end! To start off, you want to pull all of your hair into a high ponytail. *You want to make sure that the top of your head has no bumps (from the ponytail of course!).* Once your ponytail is on the top of your head, you're going to grab a small-medium section of hair right above your left ear. Where you grab your hair determines how the braid placement will be, so the key is to go for right above your ear! Leave the rest of your hair in the ponytail, and braid the section of hair and secure with an elastic. Pull the braided section of hair across your head so it looks like it is a headband, and bobbypin or clip it in place. Take your hair out of the ponytail and position it accordingly around the ponytail.

Power Braid (working out)- This is my favorite way to wear my hair when I am working out or going for a run! This hairstyle does not fly in your face or come undone while working out, which is a plus. To start off, just put your hair into a high ponytail. Braid the ponytail all the way down and tie it off with an elastic. (This was the start of the braided top knot!)

Braid your Bangs Back - Keep your hair completely natural, and take a front section (or your bangs) and braid them back. Secure them on the side of your head with a bobbypin. This look literally takes 30 seconds but it makes your hair look much more put together!


I hope you guys try out some of these hairstyles for this upcoming week! They're much different than my typical hair for school and I can't wait to wear some of these styles to school! Tell me in the comments below what you think of them and if you tried them out. Until next time, stay classy!


-Landon